FINALLY . . . How To Use Custom Maps On The Mac, The Easy Way
Okay, it's been a long time in coming. But I'm finally able to reveal an extremely easy method of using the custom maps made for the PC version of TRON 2.0, on the PowerPC Mac OSX version of the game.
If you own a newer Intel Mac, then these instructions are not for you. I would recommend playing the Windows PC version of TRON 2.0 instead, through the use of Boot Camp.
There are three ways of doing it, two of which were covered back in my CONFIRMED . . . Custom Maps DO Work On The Mac article. (Though the FAQ needs to be corrected and updated, regarding the first approach.) Now, here is a third approach.
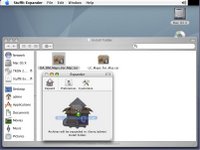
Drag and drop each .RAR file from the Finder on to the Stuffit window, one at a time. The program will decompress each file. The Preferences button allows you to customize which directory the decompressed files will end up in.
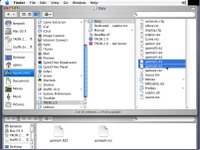 Once both files have been decompressed, use the Finder window to navigate to the directory where they're located. Then open another new Finder window, and view your Applications directory. Change the view to Columns mode. Click on the TRON 2.0 folder, then the Data folder. Highlight both the gamep5.rez and gamep6.rez files with your mouse.
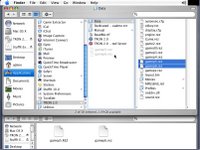
Drag and drop these two files, into the parent TRON 2.0 folder. This will move them safely out of the way, to be kept as backups in case you ever want to return to your original install state.
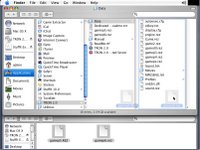
Now highlight the two .REZ files that you extracted earlier, in the original Finder window. Drag them to the column for the Data folder.
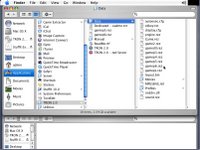
Finally, drop them in the Data folder. These two files are replacements for the original gamep5.rez and gamep6.rez files.
That's it! That's all there is to it, to making custom TRON 2.0 maps work on the Mac version of the game.
These replacement files will not affect the game in any way, other than allowing you to play custom maps in addition to the default retail maps. These specially prepared .REZ file custom map packs, created on a PC, are completely compatible with the Mac version. That's because TRON 2.0 on the Mac is, essentially, the PC version being emulated. Almost all the files between the two versions are identical. There are only a few small differences.
In the future, I will also talk about getting mods to work on the Mac version. But for now, download these custom map packs and play the maps!
In closing, I'd like to thank the following people for their help:
Tomzer - For giving me the opportunity to look at some files from the Mac version of the game, which allowed me to guess the previous two approaches.
Mr. Anderson - For working with everyone involved, and providing Ocelot with map packs to test.
9VoltChicken - For helping to co-ordinate the testing, putting me in touch with Ocelot, and coming up with the idea for this third approach.
Ocelot - Biggest thanks go to Ocelot, a TRON 2.0 Mac player who tested out this third approach and confirmed that it works. (And he confirmed that the other two approaches, work as well . . . with the first approach only needing minor corrections, that are forthcoming.)
If you own a newer Intel Mac, then these instructions are not for you. I would recommend playing the Windows PC version of TRON 2.0 instead, through the use of Boot Camp.
There are three ways of doing it, two of which were covered back in my CONFIRMED . . . Custom Maps DO Work On The Mac article. (Though the FAQ needs to be corrected and updated, regarding the first approach.) Now, here is a third approach.
- Download the following specially prepared map packs, for the Mac:
LC Map Pack - 375.5 MB
Contains all current custom Light Cycle maps.
DA and DM Map Pack - 126.3 MB
Contains all current custom Disc Arena and Derez maps, except Capture the Bit (CTB2 TDM).
Updated Capture the Bit (aka CTB2 TDM) - 28 MB
A specially prepared version of the Capture the Bit Team Derez map, for the Mac.
Using a file download manager to download these files, is strongly advised. - Download Stuffit Expander or WinRAR for the Mac, and install the program.
Note that the rest of this article will demonstrate using Stuffit Expander, to decompress these files.

Drag and drop each .RAR file from the Finder on to the Stuffit window, one at a time. The program will decompress each file. The Preferences button allows you to customize which directory the decompressed files will end up in.
 Once both files have been decompressed, use the Finder window to navigate to the directory where they're located. Then open another new Finder window, and view your Applications directory. Change the view to Columns mode. Click on the TRON 2.0 folder, then the Data folder. Highlight both the gamep5.rez and gamep6.rez files with your mouse.
Drag and drop these two files, into the parent TRON 2.0 folder. This will move them safely out of the way, to be kept as backups in case you ever want to return to your original install state.

Now highlight the two .REZ files that you extracted earlier, in the original Finder window. Drag them to the column for the Data folder.

Finally, drop them in the Data folder. These two files are replacements for the original gamep5.rez and gamep6.rez files.
That's it! That's all there is to it, to making custom TRON 2.0 maps work on the Mac version of the game.
These replacement files will not affect the game in any way, other than allowing you to play custom maps in addition to the default retail maps. These specially prepared .REZ file custom map packs, created on a PC, are completely compatible with the Mac version. That's because TRON 2.0 on the Mac is, essentially, the PC version being emulated. Almost all the files between the two versions are identical. There are only a few small differences.
In the future, I will also talk about getting mods to work on the Mac version. But for now, download these custom map packs and play the maps!
In closing, I'd like to thank the following people for their help:
Tomzer - For giving me the opportunity to look at some files from the Mac version of the game, which allowed me to guess the previous two approaches.
Mr. Anderson - For working with everyone involved, and providing Ocelot with map packs to test.
9VoltChicken - For helping to co-ordinate the testing, putting me in touch with Ocelot, and coming up with the idea for this third approach.
Ocelot - Biggest thanks go to Ocelot, a TRON 2.0 Mac player who tested out this third approach and confirmed that it works. (And he confirmed that the other two approaches, work as well . . . with the first approach only needing minor corrections, that are forthcoming.)


 View my complete profile
 Contact Me